# Email Magic Link Authentication
> How to implement Email Magic Link authentication across different frameworks
> For the complete documentation index, see [llms.txt](/docs/llms.txt).
Email magic link authentication is a two-step process:
1. The user enters their email address and requests a magic link
2. The user clicks the link in their email, which redirects them back to your application to complete authentication
Email OTP has been shown to have up to a 3x higher conversion rate and a
10-second faster flow compared to magic links. Consider using [Email
OTP](/docs/wallets/authentication/login-methods/email-otp) for better user
experience.
## Implementation Options
You can implement Email Magic Link authentication in two ways:
* [Pre-built UI Components](#pre-built-ui-components) - Quick implementation with minimal code
* [Custom UI](#custom-ui) - Complete control over the user experience
## Pre-built UI Components
Wallet APIs provides pre-built UI components that handle the entire Email Magic Link authentication flow with minimal code.
### Step 1: Add Authentication Components to Your Page
Before configuring your authentication, first add one of the pre-built components to your application:
## Using Modal Authentication
To add authentication in a modal popup:
```tsx twoslash
import React from "react";
import { useAuthModal } from "@account-kit/react";
export default function MyPage() {
const { openAuthModal } = useAuthModal();
return ;
}
```
For more details on modal configuration, see the [Modal Authentication](/docs/wallets/react/ui-components#modal-auth) documentation.
Or:
## Using Embedded Authentication
To embed authentication directly in your page:
```tsx twoslash
import React from "react";
import { AuthCard } from "@account-kit/react";
export default function MyLoginPage() {
return (
);
}
```
For more details on embedded authentication, see the [Embedded Authentication](/docs/wallets/react/ui-components#embedded-auth) documentation.
### Step 2: Configure Email Magic Link in UI Components
After adding the components, configure the Email Magic Link authentication in your application config:
```tsx twoslash
import { AlchemyAccountsUIConfig, createConfig } from "@account-kit/react";
import { sepolia, alchemy } from "@account-kit/infra";
const uiConfig: AlchemyAccountsUIConfig = {
auth: {
sections: [
[
{
type: "email",
emailMode: "magicLink",
// Optional customizations:
buttonLabel: "Continue with Email",
placeholder: "Enter your email address",
},
],
],
},
};
export const config = createConfig(
{
transport: alchemy({ apiKey: "your-api-key" }),
chain: sepolia,
},
uiConfig,
);
```
## Custom UI
If you need complete control over the user experience, you can implement your own custom UI for Email Magic Link authentication using Wallet APIs hooks.
### Step 1: Send the Magic Link
First, prompt your user for their email address and send a magic link:
```tsx twoslash
import { useAuthenticate } from "@account-kit/react";
// Inside your component
const { authenticate } = useAuthenticate();
// When the user submits their email
const handleSendMagicLink = (email: string) => {
authenticate(
{
type: "email",
emailMode: "magicLink",
email,
},
{
onSuccess: () => {
// onSuccess only fires once the entire flow is done (email magic link + optional MFA).
// It still runs even if the final step completes in another tab/window.
},
onError: (error) => {
// Handle error
},
},
);
};
```
### Step 2: Handle the Redirect
When the user clicks the magic link in their email, they'll be redirected back to your application. You need to extract the authentication bundle from the URL and complete the authentication:
```tsx twoslash
import { useEffect } from "react";
import { useAuthenticate } from "@account-kit/react";
// Inside your component
const { authenticate } = useAuthenticate();
// Handle the redirect when the component mounts
useEffect(() => {
const handleRedirect = () => {
const url = new URL(window.location.href);
const bundle = url.searchParams.get("bundle");
if (bundle) {
authenticate(
{
type: "email",
bundle,
},
{
onSuccess: () => {
// onSuccess only fires once the entire flow is done (email magic link + optional MFA).
// It still runs even if the final step completes in another tab/window.
},
onError: (error) => {
// Handle error
},
},
);
}
};
handleRedirect();
}, [authenticate]);
```
### Step 3: Track Authentication Status
Use the `useSignerStatus` hook to determine if the user is authenticated:
```tsx twoslash
import { useSignerStatus } from "@account-kit/react";
// Inside your component
const { isConnected } = useSignerStatus();
// You can use isConnected to conditionally render UI
```
This guide assumes you have already followed the [Setup
Guide](/docs/wallets/react-native/signer/setup-guide) and have set up the
Account Provider using this
[guide](/docs/wallets/react-native/signer/authenticating-users/setting-up-the-accounts-provider).
Refer to the guides above for more information on how to set up
your project.
For a complete example of how to set up a project and use the various
available authentication methods, refer to the [quickstart
example](https://github.com/alchemyplatform/account-kit-expo-quickstart).
### Set the email mode to `Magic Link` in your Wallet APIs dashboard
In the Wallet APIs dashboard:
* Navigate to the **Wallet APIs** tab
* Select the config you would be using for your project and click the **Edit** button
* Scroll down to the **Email Mode** options in the **Email** section and select **Magic Link**
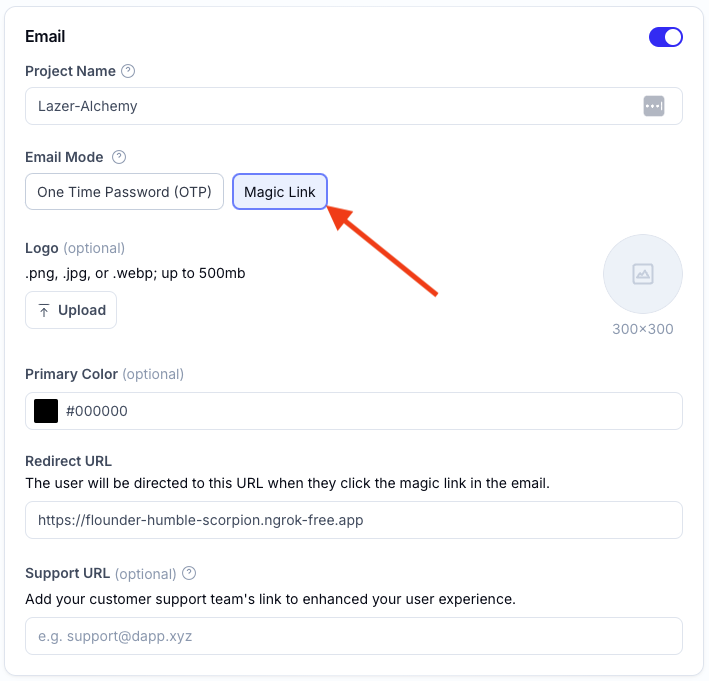 * Click the **Save Changes** button
### Send an email magic link to a user
To send an email magic link to a user, you can use the `authenticate()` function from the `useAuthenticate()` hook with the `type` set to `email` and the `emailMode` set to `magicLink`.
```tsx twoslash sign-in-with-magic-link.tsx
import { useAuthenticate } from "@account-kit/react-native";
import React, { useState } from "react";
import { Alert, View, Text, TextInput, Button, Pressable } from "react-native";
function SignInWithOtp() {
const { authenticate } = useAuthenticate();
const [email, setEmail] = useState("");
const handleUserSignInWithMagicLink = () => {
try {
authenticate({
email,
type: "email",
});
// Magic link sent to the user's email. Prompt the user to click the link in their email.
} catch (e) {
Alert.alert("Error sending Magic Link. Check logs for more details.");
console.log("Error sending Magic Link: ", e);
}
};
return (
Enter Your Email to Sign In
setEmail(val.toLowerCase())}
placeholder="john@doe.com"
/>
{({ pressed }) => (
Sign In
)}
);
}
```
### Authenticate user via deep link
When a user clicks on the magic link in their email, it should deep link to your app if this has been setup correctly.
A `bundle` parameter present in the deep link url will be used to authenticate the user and save the user's session.
Here's an example of what this might look like:
```tsx example.tsx twoslash
import { useEffect } from "react";
import { Linking } from "react-native";
import { useAuthenticate } from "@account-kit/react-native";
const App = () => {
const { authenticate } = useAuthenticate();
// Authenticate a user using a bundle returned from a deep link
const handleUserAuth = async ({ bundle }: { bundle: string }) => {
authenticate({ bundle, type: "email" });
};
// Handle incoming deep links and authenticate the user
const handleIncomingURL = (event: { url: string }) => {
const regex = /[?&]([^=#]+)=([^&#]*)/g;
let params: Record = {};
let match: RegExpExecArray | null;
while ((match = regex.exec(event.url))) {
if (match[1] && match[2]) {
params[match[1]] = match[2];
}
}
if (!params.bundle) {
return;
}
handleUserAuth({
bundle: params.bundle ?? "",
});
};
// Create a subscription to handle incoming deep links
useEffect(() => {
const subscription = Linking.addEventListener("url", handleIncomingURL);
return () => subscription.remove();
}, []);
return null;
};
```
## Other JavaScript frameworks
Email magic link authentication allows you to log in and sign up users using an email address. Your users receive a link in their inbox which redirects them to your site (configured in the dashboard) to complete login.
The OTP email flow is more reliable across different browser environments. OTP flows have also been shown to have up to a 3x higher conversion rate and a 10-second faster flow compared to magic link.
For setting up the OTP flow, see [Email OTP Authentication](/docs/wallets/authentication/login-methods/email-otp).
For setting up an account config, see the [authentication quickstart](/docs/wallets/signer/quickstart).
## Authenticate a user
```ts twoslash
import { signer } from "./signer";
// send the email
// resolves when the user is fully authenticated (magic link + optional MFA), even if completion happens in another tab/window
await signer.authenticate({
type: "email",
emailMode: "magicLink",
email: "user@mail.com",
});
// later once the user has clicked the link
const url = new URL(window.location.href);
const bundle = url.searchParams.get("bundle");
if (!bundle) {
throw new Error("No bundle found in URL");
}
// resolves when the user is fully authenticated (magic link + optional MFA), even if completion happens in another tab/window
await signer.authenticate({
type: "email",
bundle,
});
```
### Track authentication status
Use `signer.on("statusChanged", callback)` and the `AlchemySignerStatus` enum to respond to OTP/MFA prompts and completion:
```ts twoslash
import { signer } from "./signer";
import { AlchemySignerStatus } from "@account-kit/signer";
signer.on("statusChanged", (status) => {
switch (status) {
case AlchemySignerStatus.AWAITING_EMAIL_AUTH:
// show OTP input UI
break;
case AlchemySignerStatus.AWAITING_MFA_AUTH:
// show TOTP input UI
break;
case AlchemySignerStatus.CONNECTED:
// authentication complete
break;
}
});
```
## Next Steps
### Add authenticator app (TOTP) verification (optional)
Enable [Multi-Factor Authentication](/docs/wallets/react/mfa/setup-mfa) to require users to enter a 6-digit TOTP code from their authenticator app after clicking the magic link. This extra layer of security protects user accounts if their email is compromised.
* Click the **Save Changes** button
### Send an email magic link to a user
To send an email magic link to a user, you can use the `authenticate()` function from the `useAuthenticate()` hook with the `type` set to `email` and the `emailMode` set to `magicLink`.
```tsx twoslash sign-in-with-magic-link.tsx
import { useAuthenticate } from "@account-kit/react-native";
import React, { useState } from "react";
import { Alert, View, Text, TextInput, Button, Pressable } from "react-native";
function SignInWithOtp() {
const { authenticate } = useAuthenticate();
const [email, setEmail] = useState("");
const handleUserSignInWithMagicLink = () => {
try {
authenticate({
email,
type: "email",
});
// Magic link sent to the user's email. Prompt the user to click the link in their email.
} catch (e) {
Alert.alert("Error sending Magic Link. Check logs for more details.");
console.log("Error sending Magic Link: ", e);
}
};
return (
Enter Your Email to Sign In
setEmail(val.toLowerCase())}
placeholder="john@doe.com"
/>
{({ pressed }) => (
Sign In
)}
);
}
```
### Authenticate user via deep link
When a user clicks on the magic link in their email, it should deep link to your app if this has been setup correctly.
A `bundle` parameter present in the deep link url will be used to authenticate the user and save the user's session.
Here's an example of what this might look like:
```tsx example.tsx twoslash
import { useEffect } from "react";
import { Linking } from "react-native";
import { useAuthenticate } from "@account-kit/react-native";
const App = () => {
const { authenticate } = useAuthenticate();
// Authenticate a user using a bundle returned from a deep link
const handleUserAuth = async ({ bundle }: { bundle: string }) => {
authenticate({ bundle, type: "email" });
};
// Handle incoming deep links and authenticate the user
const handleIncomingURL = (event: { url: string }) => {
const regex = /[?&]([^=#]+)=([^&#]*)/g;
let params: Record = {};
let match: RegExpExecArray | null;
while ((match = regex.exec(event.url))) {
if (match[1] && match[2]) {
params[match[1]] = match[2];
}
}
if (!params.bundle) {
return;
}
handleUserAuth({
bundle: params.bundle ?? "",
});
};
// Create a subscription to handle incoming deep links
useEffect(() => {
const subscription = Linking.addEventListener("url", handleIncomingURL);
return () => subscription.remove();
}, []);
return null;
};
```
## Other JavaScript frameworks
Email magic link authentication allows you to log in and sign up users using an email address. Your users receive a link in their inbox which redirects them to your site (configured in the dashboard) to complete login.
The OTP email flow is more reliable across different browser environments. OTP flows have also been shown to have up to a 3x higher conversion rate and a 10-second faster flow compared to magic link.
For setting up the OTP flow, see [Email OTP Authentication](/docs/wallets/authentication/login-methods/email-otp).
For setting up an account config, see the [authentication quickstart](/docs/wallets/signer/quickstart).
## Authenticate a user
```ts twoslash
import { signer } from "./signer";
// send the email
// resolves when the user is fully authenticated (magic link + optional MFA), even if completion happens in another tab/window
await signer.authenticate({
type: "email",
emailMode: "magicLink",
email: "user@mail.com",
});
// later once the user has clicked the link
const url = new URL(window.location.href);
const bundle = url.searchParams.get("bundle");
if (!bundle) {
throw new Error("No bundle found in URL");
}
// resolves when the user is fully authenticated (magic link + optional MFA), even if completion happens in another tab/window
await signer.authenticate({
type: "email",
bundle,
});
```
### Track authentication status
Use `signer.on("statusChanged", callback)` and the `AlchemySignerStatus` enum to respond to OTP/MFA prompts and completion:
```ts twoslash
import { signer } from "./signer";
import { AlchemySignerStatus } from "@account-kit/signer";
signer.on("statusChanged", (status) => {
switch (status) {
case AlchemySignerStatus.AWAITING_EMAIL_AUTH:
// show OTP input UI
break;
case AlchemySignerStatus.AWAITING_MFA_AUTH:
// show TOTP input UI
break;
case AlchemySignerStatus.CONNECTED:
// authentication complete
break;
}
});
```
## Next Steps
### Add authenticator app (TOTP) verification (optional)
Enable [Multi-Factor Authentication](/docs/wallets/react/mfa/setup-mfa) to require users to enter a 6-digit TOTP code from their authenticator app after clicking the magic link. This extra layer of security protects user accounts if their email is compromised.