
How to use webhooks on Optimism
Written by Alchemy
If you want your web3 application to communicate with third-party apps or services, you’re going to love webhooks. In this tutorial, we’ll learn how to set up and use webhooks on Optimism. Then we’ll show you how you can set up automated notifications for sending and receiving ETH on Optimism in Slack.
What is a webhook?
Webhooks are tools web3 developers can use to allow third-party apps or services to communicate with applications when an event occurs. This technology is more efficient than continuously polling nodes to check if a particular state has changed via an API, as webhooks allow these servers to push notifications to the app at the time of the event.
Alchemy webhooks have a lot of potential to improve the user experience and drive the engagement of web3 applications and services, such as tracking NFT sales in a Discord channel or sending wallet activity to a Slack channel.
What Optimism events can be tracked with webhooks?
There are three types of Optimism events we can receive notifications for via Alchemy webhooks:
- Mined transactions - a transaction is completed
- Dropped transactions - a transaction fails or is dropped from the mempool
- Address Activity - tokens are received or transferred
For this tutorial, we will be tracking Address Activity events, where we’ll receive Slack notifications for sending and receiving ETH on Optimism.
How to set up Optimism webhooks
Here is the 10-step process for setting up Optimism webhooks and automating notifications to Slack. This process can be followed for many other 3rd-party platforms supported by Zapier like Discord, Twitter, and more!
1. Create an Ethereum wallet
We need an Ethereum wallet to send and receive transactions. For this tutorial, we’ll use MetaMask, a browser-based digital asset wallet to manage Ethereum accounts. Download MetaMask and create a free account
2. Sign into Alchemy
To make things easy, sign up for a free Alchemy developer account, so you can communicate with the Ethereum chain without having to run your own nodes.
3. Create an API key
Next, create a new app to generate an API key and to connect to the Optimism test network.
Navigate to the Create App page in your Alchemy Dashboard by hovering over Apps in the navbar and click Create App.
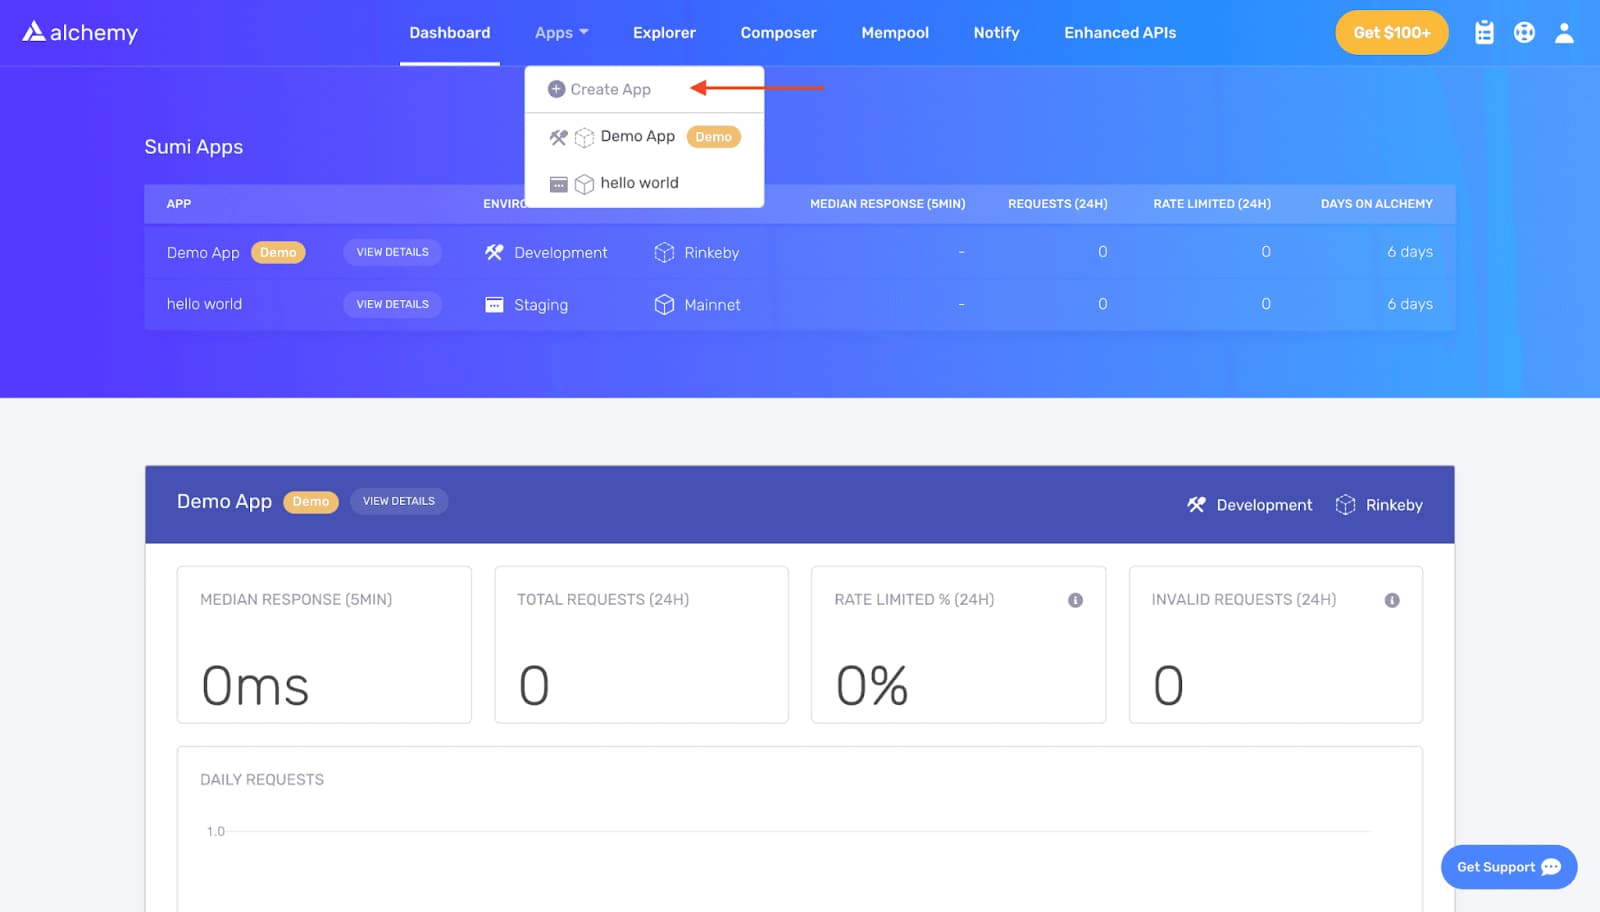
Name your app (we chose “optimism_webhooks”), and write a short description.
Next, select Optimism for your chain and choose Optimism Goerli for your network.
Then, click Create app.
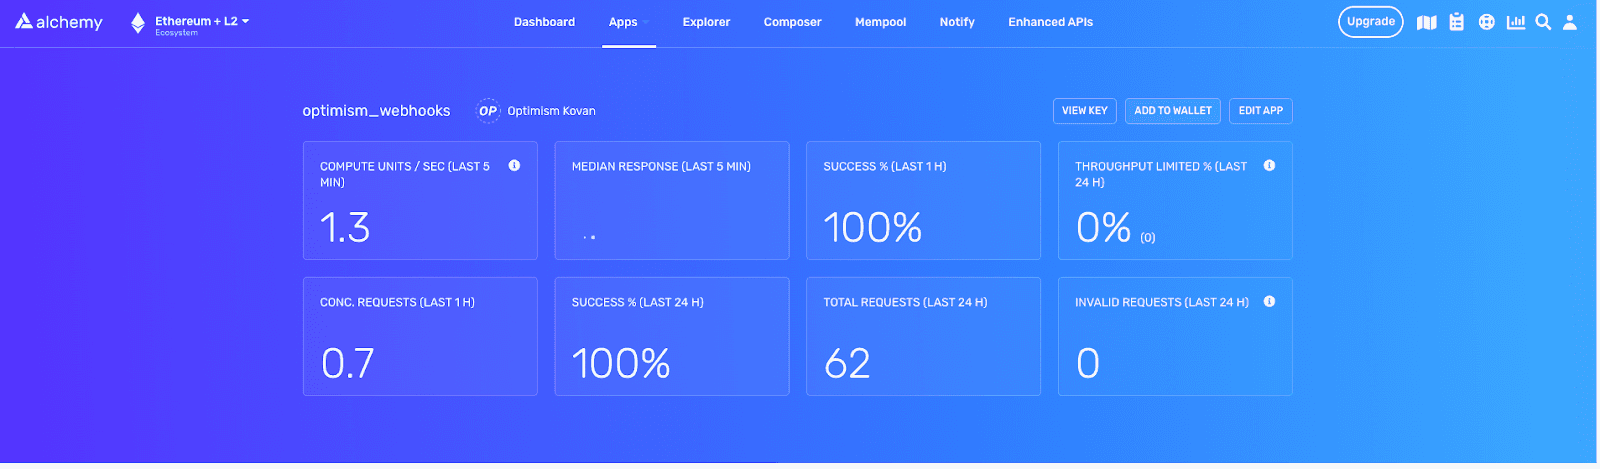
Now, click on the newly created app link under Apps and click Add to Wallet.
You should now be connected to Optimism Goerli testnet on Metamask!
4. Get Testnet ETH from Goerli faucet
To deploy your smart contract to the Optimism test network, get ETH from a Goerli faucet.
First, change your MetaMask network to Ethereum Goerli, and then click Claim.
Then, you should see 0.05 ETH in your MetaMask account on the Goerli testnet.
5. Bridge Goerli ETH to Optimism-Goerli Testnet
There is no public bridge to transfer Goerli ETH to Optimism yet, but it can be accomplished using Cast from Foundry, a toolkit for Ethereum application development.
Use this code snippet:
cast send --legacy --rpc-url=$ALCHEMY-OPT-GOERLI-ENDPOINT --value=0.001ether --private-key= 0x636Af16bf2f682dD3109e60102b8E1A089FedAa8
Now that you have Goerli ETH on the Opt-Goerli testnet.
6. Create a zap and an Optimism webhook URL
Now, create your Zapier account or log into your account if you already have a Zapier account.
Next, in the dashboard, click Create Zap in the top left corner.
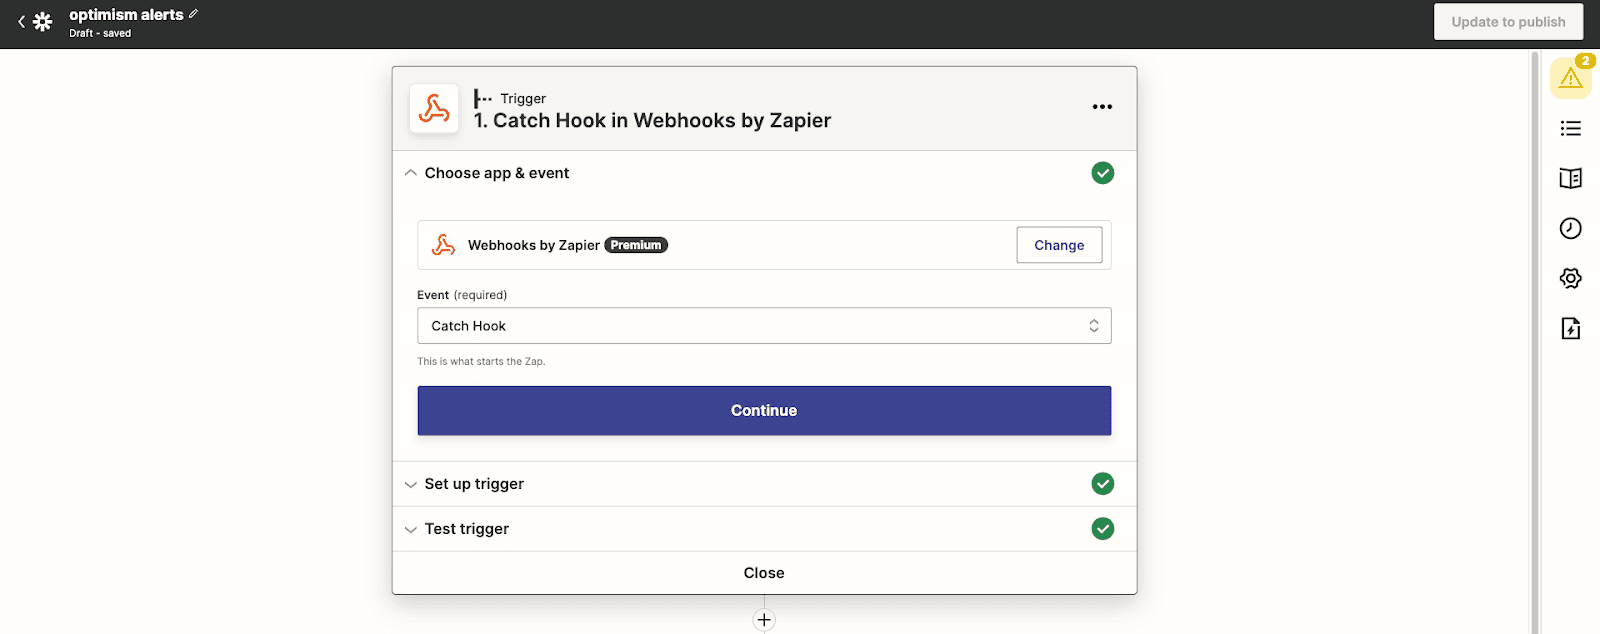
We will now create the webhook URL for sending the webhook response from Alchemy to Zapier.
Under Trigger, search and select Webhooks by Zapier as the app event/trigger.
For the Trigger Event, select Catch Hook since Zapier is waiting for Alchemy’s address activity webhook to send the event data to the URL whenever a transfer occurs.
Click Continue to the Set up trigger section and copy the Custom Webhook URL.
7A. Create an Optimism webhook
Now, we need to create the address activity webhook to track transfer events and send that data off to the Zapier webhook URL.
We will show two ways that you can set up the webhook, first from Alchemy’s Notify tab within the dashboard, and second programmatically by using Alchemy’s Notify API (recommended for dealing with address activity webhooks for 10+ addresses).
- Make sure you are in the Ethereum + L2 ecosystem on the upper left of the Alchemy dashboard
- Navigate to the Notify tab and click + Create Webhook button in the Address Activity section
- Select Chain to be Optimism
- Select Network to be Goerli
- Paste in the webhook URL you copied from Zapier in the last step
- Paste your MetaMask wallet address into the Ethereum Addresses section.
NOTE: If you want to test if the Alchemy webhook successfully sends requests to Zapier’s webhook URL before confirming the creation, click on Test Webhook next to the webhook URL. Or if you have already created the webhook but want to test again, click on the three dots by your webhook and select Send Test Notification.
Now, go back to Zapier and continue to the Test trigger section, and click Test trigger.
If you see a “We found a request message,” congratulations!
7B. Create an Optimism webhook using notify API
If you want to create webhooks for multiple Optimism addresses, usw the Notify API. To get started, copy your Alchemy authentication token (X-Alchemy-Token) from the upper right corner of your Notify dashboard under the AUTH TOKEN button.

Then, navigate to your command line and type the following:
*curl https://dashboard.alchemy.com/api/create-webhook \
*-X POST \
*-H "X-Alchemy-Token":"your-X-Alchemy-Token" \
-d '\{"network":"OPT_KOVAN","webhook_type":"ADDRESS_ACTIVITY","webhook_url":"your-Zapier-Webhook-URL", "addresses":["your-Ethereum-Address"]\}'``
Remember to use your own your-X-Alchemy-Token, your-Zapier-Webhook-URL, and your-Ethereum-Address (aka, the wallet address you pasted), and you can add as many Ethereum addresses as you’d like to track their transfer events.
After refreshing, you should see the newly created address activity webhook appear in your Notify dashboard with all your specified parameters.
8. Parse Optimism webhook responses in zapier
Given the webhook response from Alchemy, we need to parse it in Zapier to create an action that sends an alert whenever our Optimism address successfully sends a transaction.
Under the Action section, select the Filter option on the right-hand side.
In Filter setup & testing, we want to continue if the Event Activity From Address (or you can simply search for fromAddress) (Text) Exactly matches our Optimism address (paste it into the last text field).
If you click Continue and find that “Your Zap would not have continued,” don’t worry! The test notification was not sent from the wallet so this message is expected.

9. Integrate your Optimism webhooks with slack
First, let’s create a Slack account and workspace. Create an account on Slack or log into your account if you already have one. Then, create a new workspace. We named ours Optimism Wallet Alerts, but feel free to use your own creativity!
Handle alerts for sending tokens
Next, we want to send a message if our wallet is the sender of a transfer event.
- Click “+” at the bottom
- Search for and select Slack in the new Action section
- For the Action Event, choose Send Channel Message
- After clicking Continue, sign in to your Slack account
- Fill out the fields to send our message in the Set up action section
- Select the channel you want the alerts to be sent in (Optimism-Wallet-Alerts in our case).
In the message text, you can get creative and choose what fields and values you want to send.
We chose these fields:

You can leave everything else on the default option.
Click continue, then test and continue.
If no errors pop up, that means we’re good to go! A Slack message should have been made on your account. Now, publish the Zap.
Congrats! Now, whenever your Optimism wallet sends out a transaction, our Zap will send a message detailing that transaction.
You can also view the run details of your Zap on the Zap History page in the Zapier dashboard.
10. Send a message to handle receiving tokens on Optimism
We also want to send alerts when our wallet is on the receiving end of an Optimism transaction.
First, edit the continue only if action.
Click on Filter Setup & Testing and press the “+ or” button, filling in Event Activity To Address (or you can simply search for fromAddress) and (Text) Exactly matches our Optimism address (paste it into the last text field).
Sweet, now our Zap will run when the Wallet is also a recipient!
Next, let’s create a Code by Zapier action between our Only continue if… and Send Channel Message in Slack actions.
You can choose either Run Python or Run Javascript. We will choose the latter but the logic works the same for Python.
After clicking Continue, we will set up our input data under Set up action as follows:
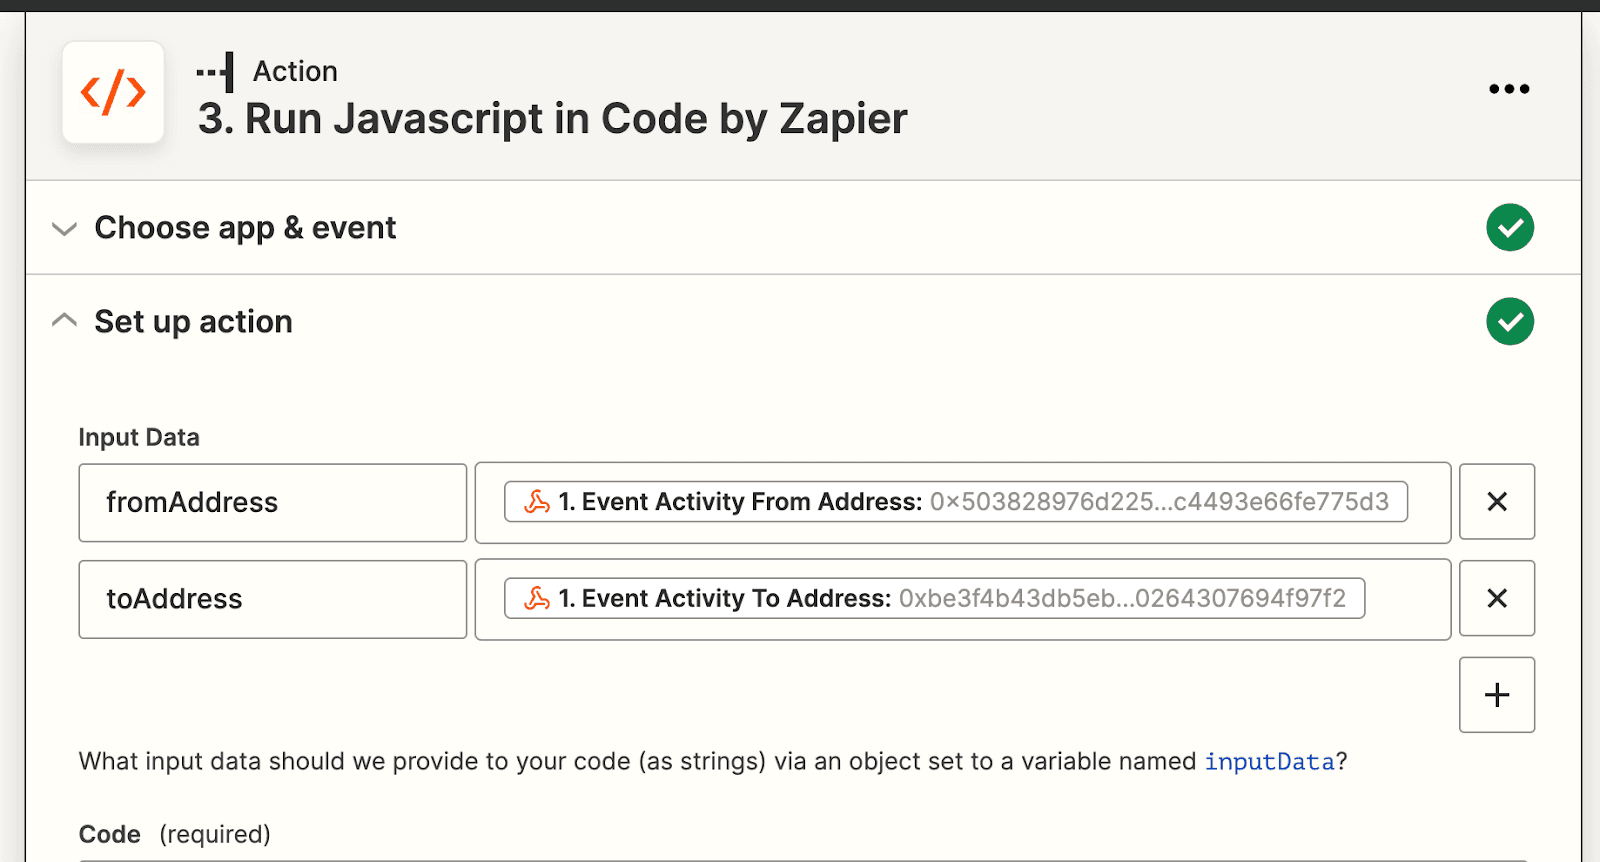
We are parsing through the webhook response again because our current notification is only written for when our wallet sends ETH. Therefore, we need to customize them for when our wallet receives ETH.
In the code block, paste in the following code (read the comments to see what each line means):
// Since JavaScript is case-sensitive, we will be comparing addresses in upper case const address = "Wallet-Address".toUpperCase\(\); // Define Account 1 \(Our wallet\) let account\_1 = ""; // Define Account 2 \(the user our wallet is sending to / receiving from\) let account\_2 = ""; // Define to use "to" or "from" in message let t\_or\_f = ""; let f\_or\_t = ""; if \(inputData.fromAddress.toUpperCase\(\) == address\) \{ // If Wallet is sending, then it is the fromAddress account\_1 = inputData.fromAddress; account\_2 = inputData.toAddress; t\_or\_f = "from"; f\_or\_t = "to"; \} else if \(inputData.toAddress.toUpperCase\(\) == address\) \{ // If Wallet is receiving, then it is the toAddress account\_1 = inputData.toAddress; account\_2 = inputData.fromAddress; t\_or\_f = "to"; f\_or\_t = "from"; \}
// Output the fields to be used in email
output = \[\{account\_1: account\_1, account\_2: account\_2, t\_or\_f: t\_or\_f, f\_or\_t: f\_or\_t\}\];
Again, remember to replace Wallet-Address with your MetaMask wallet address. When testing the action, don’t worry if it doesn’t assign anything to the output variables.
Lastly, go to the Send Channel Message in Slack action and click on the Set up action section.
We will now replace the generic fields from the webhook response in the message text with the more dynamic outputs from our Javascript code, which are customized depending on whether our Wallet sent or received tokens:

Click Continue and test your action. Then publish!
Congrats! You just finished creating Optimism webhooks!
Related Overviews


Build blockchain magic
Alchemy combines the most powerful web3 developer products and tools with resources, community and legendary support.