Network
Launch Date
Consensus
Note
Sepolia
Oct 2021
PoW
Like-for-like representation of Ethereum
Görli
Jan 2019
PoA
Proof-of-Authority
Kiln
Mar 2022
PoS
Post-Merge (for ETH2), shadow fork of the mainnet
Kintsugi
Dec 2021
PoS
DEPRECATED, use Kiln; post-Merge (for ETH2)
Ropsten
Nov 2016
PoW
DEPRECATED, use Sepolia; the Merge to happen on Jun 8, 2022
Rinkeby
Apr 2017
PoA
DEPRECATED, use Görli and Görli Faucet
Kovan
Mar 2017
PoA
DEPRECATED, use Sepolia or Görli
List of active and deprecated Ethereum testnets, including Kintsugi.
Features
Optimistic rollup 
ZK-rollup 
Proof
Uses fraud proofs to prove transaction validity. 
Uses validity (zero-knowledge) proofs to prove transaction validity. 
Capital efficiency
Requires waiting through a 1-week delay (dispute period) before withdrawing funds. 
Users can withdraw funds immediately because validity proofs provide incontrovertible evidence of the authenticity of off-chain transactions. 
Data compression
Publishes full transaction data as calldata to Ethereum Mainnet, which increases rollup costs. 
Doesn't need to publish transaction data on Ethereum because ZK-SNARKs and ZK-STARKs already guarantee the accuracy of the rollup state. 
EVM compatibility
Uses a simulation of the Ethereum Virtual Machine (EVM), which allows it to run arbitrary logic and support smart contracts. 
Doesn't widely support EVM computation, although a few EVM-compatible ZK-rollups have appeared. 
Rollup costs
Reduces costs since it publishes minimal data on Ethereum and doesn't have to post proofs for transactions, except in special circumstances. 
Faces higher overhead from costs involved in generating and verifying proofs for every transaction block. ZK proofs require specialized, expensive hardware to create and have high on-chain verification costs. 
Trust assumptions
Doesn't require a trusted setup. 
Requires a trusted setup to work. 
Liveness requirements
Verifiers are needed to keep tabs on the actual rollup state and the one referenced in the state root to detect fraud. 
Users don't need someone to watch the L2 chain to detect fraud. 
Security properties 
Relies on cryptoeconomic incentives to assure users of rollup security. 
Relies on cryptographic guarantees for security. 
Start building
on Alchemy.
Sign up for free
Start building on Optimism.
Sign up for free
Start building on Arbitrum.
Sign up for free
Start building on Ethereum.
Sign up for free
Start building on Polygon.
Sign up for free
Start building on Starknet.
Sign up for free
Start building on Flow.
Sign up for free
kiln faucet
Get free Kiln ETH.
Start building today
Goerli faucet
Get free Goerli ETH.
Start building today
SEPOLIA FAUCET
Get free Sepolia ETH.
Start Building Today
mumbai faucet
Get free Mumbai Matic.
Start building today
rinkeby faucet
Get free Rinkeby
ETH.
Start building today
Start building on Ethereum.
Get started for free
Start building on Ethereum.
Get started for free
Start building on Flow.
Get started for free
Start building on Polygon.
Get started for free
Start building on Starknet.
Get started for free
Start building on Optimism.
Get started for free
Start building on Solana.
Get started for free
Start building on Solana.
Sign up for beta access
Start building on Solana.
Join the waitlist
Arbitrum logo
Start building on Arbitrum.
Get started for free
Build with Alchemy's
Gas Manager & Bundler APIs
Learn
Solidity at
Alchemy
University
Get started today
Build with Alchemy's
Gas Manager & Bundler APIs
curl 
https://release.solana.com/v1.10.32/solana-install-init-x86_64-pc-windows-msvc.exe 
--output 
C:\solana-install-tmp\solana-install-init.exe 
--create-dirs
Infra
POLYGON NODE OVERVIEW

Polygon Nodes: Everything You Need to Know

Learn About the Primary Types of Polygon Nodes, and How to Start Building with a Polygon Node Provider
Last Updated:
September 27, 2022
Table of Contents
Table of Contents
Table of Contents

{{building-on-polygon}}

Similar to the Ethereum mainnet, Polygon, a Layer-2 solution, uses nodes to ensure that all computers participating in the network are behaving correctly. However, Polygon nodes have a different architecture – where it categorizes and delegates sub-section of processing tasks to different node layers.

In this article, we’ll go through the different types of Polygon nodes, how to create and run a Polygon node, and how node providers help make this entire process easier.

What is Polygon?

Polygon is a sidechain, an Ethereum scaling solution, that reduces gas costs and improves scalability by performing resource intensive tasks off of the main Ethereum blockchain while maintaining compatibility with the Ethereum Virtual Machine (EVM).

Formerly known as MATIC, Polygon rebranded in 2017 but kept MATIC as its ticker symbol. Polygon and MATIC are, therefore, one and the same. The main test network for Polygon is called Mumbai. Mumbai is a testnet where developers can use test MATIC tokens to test Polygon applications in a cost-free environment.

What is a Polygon node?

Polygon nodes are computers that have a downloaded copy of the Polygon blockchain and participate in the Polygon network, but because Polygon has multiple node types - Bor nodes, Heimdall nodes, full nodes, Sentry nodes, and validator nodes - each node serves a different purpose.

The Polygon network is broadly split into three layers: 

  1. The Ethereum mainnet - used for contract Proof-of-Stake, checkpointing, and rewards
  2. The Heimdall node layer - used for validation
  3. The Bor node layer - used for producing blocks

Below, we focus on the Heimdall and Bor nodes in more detail, as well as how they can be used in conjunction for more complex functions.

What is a Bor node?

Bor nodes are the most rudimentary type of Polygon node, and are responsible for the aggregation of transactions into blocks, which can then be parsed and utilized by Heimdall nodes. In this way, Bor nodes act as one half of a roll-up scheme, which also aggregates data into more efficiently processable forms. Block producers are chosen randomly from a set of validators nodes.

What is a Heimdall node?

Heimdall nodes validate all Bor blocks since a previous checkpoint, and then aggregate all blocks created by the Bor nodes into a Merkle tree. Heimdall nodes also periodically send the hash of the Merkle root to the main blockchain. Checkpoints are incredibly important for the Polygon system, as they manage the randomness of block producers and the validator set selection for a given span or set of blocks.

What is a full node?

A full node is a node that completely validates transactions and blocks and is of two types: 1.) pruned full nodes and 2.) archival full nodes, also known as archive nodes. 

A pruned full node discards all failed transaction states and only goes back a set number of blocks to be more lightweight. Archive nodes are full nodes that also save all historical states of the chain. In essence, Archive nodes contain the exact states of the chain from inception to the most recent transactions. 

One problem that Polygon archive nodes may run into is the archive node limit, as the total chain nears 16TB of state data. Because of this, it is recommended to either increase the node storage, delete and resync nodes so wasted data is cleared out, or use a Polygon node provider.

What is a Sentry node?

A sentry node is a full node that runs both Heimdall and Bor nodes to download data from other nodes and transfer this data to selected validator nodes, while also having access to the entire Polygon network. Sentry nodes also isolate validators from the public, and can protect validator nodes from attack vectors like Distributed Denial of Service (DDOS) attacks, which can slow down or halt transaction throughput.

What is a Polygon validator?

A Polygon validator is someone with a validator node on one machine, a sentry node on a different machine, and MATIC token staked. Polygon validators are randomly selected to validate transactions in the Heimdall layer. A validator node has a similar architecture to a sentry node, except it is the method by which data is passed to and from the sentry node. 

What is a Polygon node provider?

Polygon node providers are companies that offer developers with Polygon node API endpoints so dApps can send requests to and receive payloads from the Polygon blockchain without having to run their own Polygon node.

While having your own Polygon full node offers some benefits such as software client customization, node providers offer significant benefits in contrast to individual Polygon nodes in terms of stability, speed, and data accuracy. Worrying about the node maintenance requires valuable engineering time, and node providers can solve this common problem.

For dApps, choosing the best Polygon node provider is an important decision when building for scale and population demand. The most vital factors from an infrastructure perspective are scalability, data accuracy, and types of nodes (e.g. full, archive, etc.), and supported blockchains (if you plan to build multichain).

From a customer perspective, it is also important for node providers to have good pricing, a helpful developer relations team, responsive support staff, and better developer tools like optimized APIs and SDKs to effectively suit web3 developers’ needs. 

How to Connect to a Polygon Node on Alchemy

There are full instructions available on how to connect to a Polygon full node using Alchemy on Polygon's official documentation, but here is a simplified explanation for getting started quickly.

1. Sign Up for Alchemy

Alchemy offers a free tier for its services, and you can quickly create a free Polygon account on the Alchemy developer platform to interact with the Alchemy Polygon API.
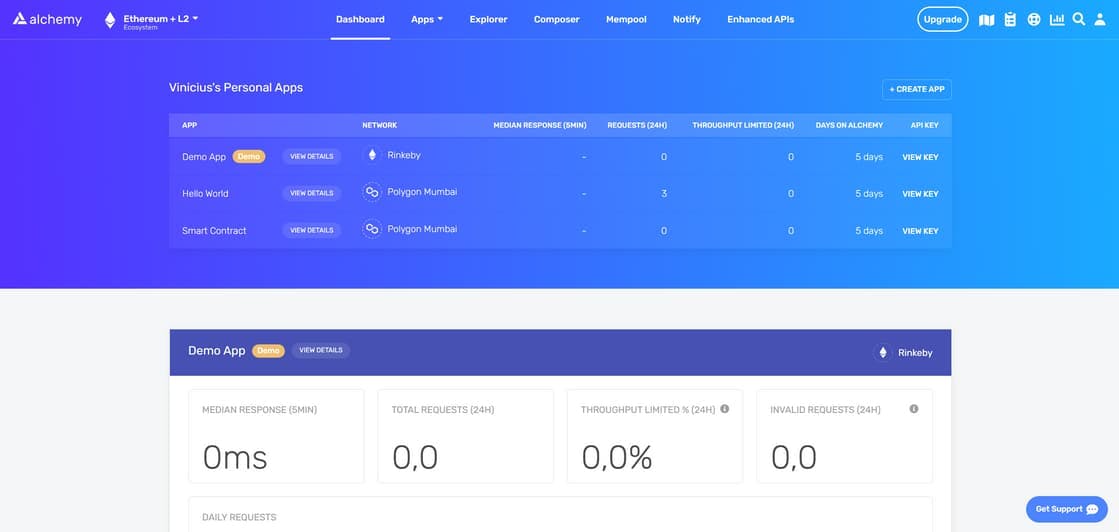
Alchemy dashboard on sign in


2. Create your Polygon Application and Generate an API key

After successfully creating an Alchemy account, you will need to generate an API key by creating an app. This authenticates the requests made to the Polygon mainnet or Mumbai testnet.

To generate a new API key, navigate to the "Apps" tab on the Alchemy dashboard navigation bar and select the "Create App" sub-tab.

After filling out the fields and selecting the testnet, click on “Create app”.

Your new app should appear in the table below.
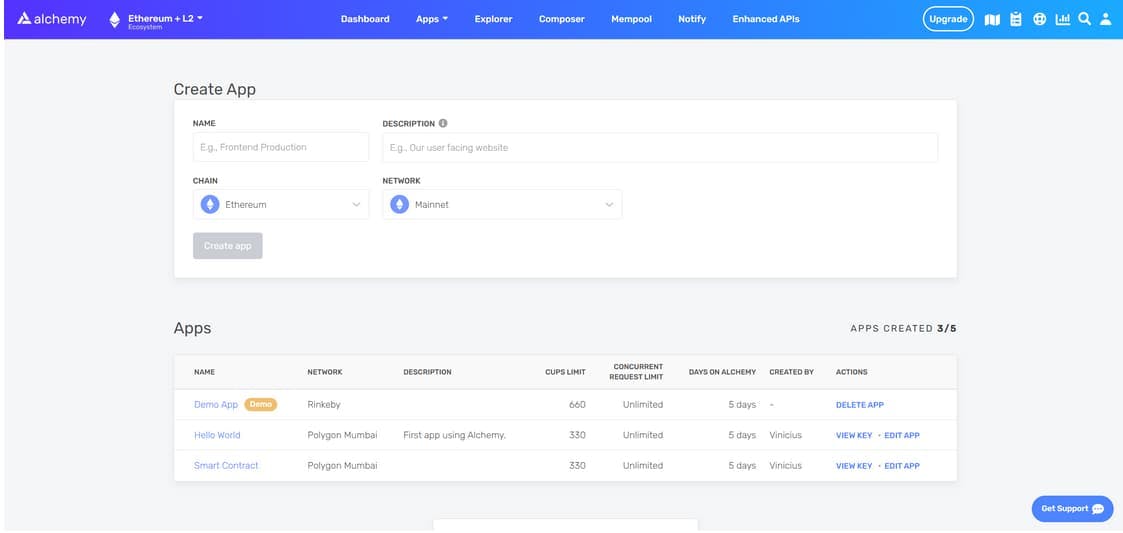
New node appears in the “Apps” table on Alchemy
New app appears in the “Apps” table


To get your custom Polygon RPC URL from Alchemy, go to your app in your Alchemy dashboard and click "View Key" in the top right corner.

Then copy your Alchemy HTTPS API key, and paste it into your application.

Note: use Alchemy Chain Connect to view public Polygon RCP URLs from multiple infrastructure providers.

 “View Key” option to set up a Polygon RPC URL for a node
“View Key” option to set up a Polygon RPC URL for a node


Step 3. Set up the Polygon API and Start Building

If you're using JavaScript and Node.js, simply install the Alchemy SDK, create an Alchemy object, and you'll be ready to start making Polygon node requests in a couple of lines of code. 

  1. Set up a project with: npm init -y
  2. Install the SDK by running the following command in your terminal: npm install alchemy-sdk.
  3. After installing the SDK, you can import and use it in your projects with Polygon as shown below

For more details on setting up the Alchemy SDK, refer to the SDK Quickstart Guide.
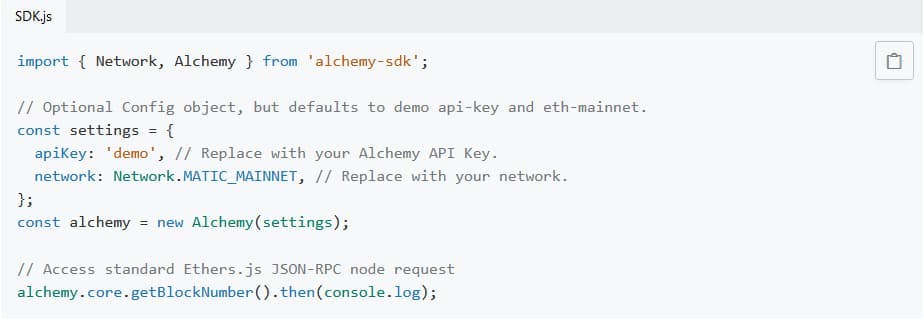
Importing the SDK for a Polygon node project

Using a Polygon node provider is easy and scalable, allowing developers of all skill levels to start building in web3.

Polygon Node Requirements

To run a Polygon full node, some technical specifications and software prerequisites need to be met. The current minimum requirements are16-32 GB of RAM and a 4-8 core CPU, with a minimum expandable storage drive of 1.2TB. Because nodes need to save more and more data as the chain's history grows, the minimum specifications will grow accordingly.

Additionally, while Polygon notes that any operating system will work fine, they highlight that the security and stability of Linux server distributions like CentOS are preferred over MacOS and Windows.

How to Set up a Polygon Full Node

If you don't want to use a Polygon node provider, and instead want to configure and maintain your own Polygon node, here is a summary of the steps you'll need to take.

1. Build Machines to Run Your Nodes

Because Linux is recommended, you’ll want to use a machine running a Linux server that can host your node. You can also remotely connect to Linux servers using Secure Shell (SSH) on the command line. Look at the hardware requirements then ensure that your machines have a pretty large minimum storage, and computing power.

2. Download the prerequisites

In terms of software requirements, Ansible should be downloaded on a machine with Python 3.x, and can be downloaded via this command: pip3 install ansible

In addition, make sure that you do not have Go or previous setups for Heimdall and Bor installed, as these will conflict with a completely new installation process. 

3. Set up and run your node

All instructions are from the official Polygon documentation for setting up and running a full node. The steps are summarized below:

  1. Ensure access to the remote machine/virtual machine, clone the given repository, and verify its functionality by setting up IPs
  2. Set up the full node, enter the remote/virtual machine, and configure the Heimdall and Bor nodes
  3. Run the full node and check logs to see if the nodes have synced correctly

Start Building on Polygon with Alchemy

Polygon is a fast-growing Ethereum sidechain that offers developers a fast, affordable, and scalable blockchain for building EVM-compatible applications. Polygon is the choice for some of the largest web2 companies such as Starbuck's new loyalty rewards program because of it's scale, affordability, and low carbon footprint.

To start building on Polygon, create a free Polygon developer account with Alchemy today!

ALCHEMY SUPERNODE - ETHEREUM NODE API

Scale to any size, without any errors

Alchemy Supernode finally makes it possible to scale blockchain applications without all the headaches. Plus, our legendary support will guide you every step of the way.

Get started for free
Supernode footer
Infra
POLYGON NODE OVERVIEW

What is a Polygon node: Everything You Need To Know

Learn About the Primary Types of Polygon Nodes, and How to Start Building with a Polygon Node Provider
Last Updated:
September 27, 2022
Last Updated:
March 14, 2023
Don't miss an update
Sign up for our newsletter to get alpha, key insights, and killer resources.
Thank you! Your submission has been received!
Oops! Something went wrong while submitting the form.
Table of Contents

Talk to an Expert

Learn how Alchemy's blockchain developer tools can help your business succeed in web3!
Valid number
Thank you! An Alchemy expert will be in touch with you shortly!
Oops! Something went wrong while submitting the form.

{{building-on-polygon}}

Table of Contents

Similar to the Ethereum mainnet, Polygon, a Layer-2 solution, uses nodes to ensure that all computers participating in the network are behaving correctly. However, Polygon nodes have a different architecture – where it categorizes and delegates sub-section of processing tasks to different node layers.

In this article, we’ll go through the different types of Polygon nodes, how to create and run a Polygon node, and how node providers help make this entire process easier.

What is Polygon?

Polygon is a sidechain, an Ethereum scaling solution, that reduces gas costs and improves scalability by performing resource intensive tasks off of the main Ethereum blockchain while maintaining compatibility with the Ethereum Virtual Machine (EVM).

Formerly known as MATIC, Polygon rebranded in 2017 but kept MATIC as its ticker symbol. Polygon and MATIC are, therefore, one and the same. The main test network for Polygon is called Mumbai. Mumbai is a testnet where developers can use test MATIC tokens to test Polygon applications in a cost-free environment.

What is a Polygon node?

Polygon nodes are computers that have a downloaded copy of the Polygon blockchain and participate in the Polygon network, but because Polygon has multiple node types - Bor nodes, Heimdall nodes, full nodes, Sentry nodes, and validator nodes - each node serves a different purpose.

The Polygon network is broadly split into three layers: 

  1. The Ethereum mainnet - used for contract Proof-of-Stake, checkpointing, and rewards
  2. The Heimdall node layer - used for validation
  3. The Bor node layer - used for producing blocks

Below, we focus on the Heimdall and Bor nodes in more detail, as well as how they can be used in conjunction for more complex functions.

What is a Bor node?

Bor nodes are the most rudimentary type of Polygon node, and are responsible for the aggregation of transactions into blocks, which can then be parsed and utilized by Heimdall nodes. In this way, Bor nodes act as one half of a roll-up scheme, which also aggregates data into more efficiently processable forms. Block producers are chosen randomly from a set of validators nodes.

What is a Heimdall node?

Heimdall nodes validate all Bor blocks since a previous checkpoint, and then aggregate all blocks created by the Bor nodes into a Merkle tree. Heimdall nodes also periodically send the hash of the Merkle root to the main blockchain. Checkpoints are incredibly important for the Polygon system, as they manage the randomness of block producers and the validator set selection for a given span or set of blocks.

What is a full node?

A full node is a node that completely validates transactions and blocks and is of two types: 1.) pruned full nodes and 2.) archival full nodes, also known as archive nodes. 

A pruned full node discards all failed transaction states and only goes back a set number of blocks to be more lightweight. Archive nodes are full nodes that also save all historical states of the chain. In essence, Archive nodes contain the exact states of the chain from inception to the most recent transactions. 

One problem that Polygon archive nodes may run into is the archive node limit, as the total chain nears 16TB of state data. Because of this, it is recommended to either increase the node storage, delete and resync nodes so wasted data is cleared out, or use a Polygon node provider.

What is a Sentry node?

A sentry node is a full node that runs both Heimdall and Bor nodes to download data from other nodes and transfer this data to selected validator nodes, while also having access to the entire Polygon network. Sentry nodes also isolate validators from the public, and can protect validator nodes from attack vectors like Distributed Denial of Service (DDOS) attacks, which can slow down or halt transaction throughput.

What is a Polygon validator?

A Polygon validator is someone with a validator node on one machine, a sentry node on a different machine, and MATIC token staked. Polygon validators are randomly selected to validate transactions in the Heimdall layer. A validator node has a similar architecture to a sentry node, except it is the method by which data is passed to and from the sentry node. 

What is a Polygon node provider?

Polygon node providers are companies that offer developers with Polygon node API endpoints so dApps can send requests to and receive payloads from the Polygon blockchain without having to run their own Polygon node.

While having your own Polygon full node offers some benefits such as software client customization, node providers offer significant benefits in contrast to individual Polygon nodes in terms of stability, speed, and data accuracy. Worrying about the node maintenance requires valuable engineering time, and node providers can solve this common problem.

For dApps, choosing the best Polygon node provider is an important decision when building for scale and population demand. The most vital factors from an infrastructure perspective are scalability, data accuracy, and types of nodes (e.g. full, archive, etc.), and supported blockchains (if you plan to build multichain).

From a customer perspective, it is also important for node providers to have good pricing, a helpful developer relations team, responsive support staff, and better developer tools like optimized APIs and SDKs to effectively suit web3 developers’ needs. 

How to Connect to a Polygon Node on Alchemy

There are full instructions available on how to connect to a Polygon full node using Alchemy on Polygon's official documentation, but here is a simplified explanation for getting started quickly.

1. Sign Up for Alchemy

Alchemy offers a free tier for its services, and you can quickly create a free Polygon account on the Alchemy developer platform to interact with the Alchemy Polygon API.

Alchemy dashboard on sign in


2. Create your Polygon Application and Generate an API key

After successfully creating an Alchemy account, you will need to generate an API key by creating an app. This authenticates the requests made to the Polygon mainnet or Mumbai testnet.

To generate a new API key, navigate to the "Apps" tab on the Alchemy dashboard navigation bar and select the "Create App" sub-tab.

After filling out the fields and selecting the testnet, click on “Create app”.

Your new app should appear in the table below.

New node appears in the “Apps” table on Alchemy
New app appears in the “Apps” table


To get your custom Polygon RPC URL from Alchemy, go to your app in your Alchemy dashboard and click "View Key" in the top right corner.

Then copy your Alchemy HTTPS API key, and paste it into your application.

Note: use Alchemy Chain Connect to view public Polygon RCP URLs from multiple infrastructure providers.

 “View Key” option to set up a Polygon RPC URL for a node
“View Key” option to set up a Polygon RPC URL for a node


Step 3. Set up the Polygon API and Start Building

If you're using JavaScript and Node.js, simply install the Alchemy SDK, create an Alchemy object, and you'll be ready to start making Polygon node requests in a couple of lines of code. 

  1. Set up a project with: npm init -y
  2. Install the SDK by running the following command in your terminal: npm install alchemy-sdk.
  3. After installing the SDK, you can import and use it in your projects with Polygon as shown below

For more details on setting up the Alchemy SDK, refer to the SDK Quickstart Guide.

Importing the SDK for a Polygon node project

Using a Polygon node provider is easy and scalable, allowing developers of all skill levels to start building in web3.

Polygon Node Requirements

To run a Polygon full node, some technical specifications and software prerequisites need to be met. The current minimum requirements are16-32 GB of RAM and a 4-8 core CPU, with a minimum expandable storage drive of 1.2TB. Because nodes need to save more and more data as the chain's history grows, the minimum specifications will grow accordingly.

Additionally, while Polygon notes that any operating system will work fine, they highlight that the security and stability of Linux server distributions like CentOS are preferred over MacOS and Windows.

How to Set up a Polygon Full Node

If you don't want to use a Polygon node provider, and instead want to configure and maintain your own Polygon node, here is a summary of the steps you'll need to take.

1. Build Machines to Run Your Nodes

Because Linux is recommended, you’ll want to use a machine running a Linux server that can host your node. You can also remotely connect to Linux servers using Secure Shell (SSH) on the command line. Look at the hardware requirements then ensure that your machines have a pretty large minimum storage, and computing power.

2. Download the prerequisites

In terms of software requirements, Ansible should be downloaded on a machine with Python 3.x, and can be downloaded via this command: pip3 install ansible

In addition, make sure that you do not have Go or previous setups for Heimdall and Bor installed, as these will conflict with a completely new installation process. 

3. Set up and run your node

All instructions are from the official Polygon documentation for setting up and running a full node. The steps are summarized below:

  1. Ensure access to the remote machine/virtual machine, clone the given repository, and verify its functionality by setting up IPs
  2. Set up the full node, enter the remote/virtual machine, and configure the Heimdall and Bor nodes
  3. Run the full node and check logs to see if the nodes have synced correctly

Start Building on Polygon with Alchemy

Polygon is a fast-growing Ethereum sidechain that offers developers a fast, affordable, and scalable blockchain for building EVM-compatible applications. Polygon is the choice for some of the largest web2 companies such as Starbuck's new loyalty rewards program because of it's scale, affordability, and low carbon footprint.

To start building on Polygon, create a free Polygon developer account with Alchemy today!

{{building-on-polygon}}

Contact Us

Talk to an expert at Alchemy to answer all of your product questions.
Valid number
Thank you! Your submission has been received!
Oops! Something went wrong while submitting the form.

Build blockchain magic with Alchemy

Alchemy combines the most powerful web3 developer products and tools with resources, community and legendary support.

Get started for free